How to Create and Use a Template in eSign
1st Mar, 2024
Whether you are creating a proposal, spreadsheet, or a contract, creating documents is an integral part of all businesses. However, creating documents takes time, especially when you are required to use the same document multiple times.
Document templates are perfect for businesses that are required to sent out the same type of document formats on a regular basis. With the eSign platform, users have the ability to create personal templates or utilise pre-built ones, depending on what better suits your needs.
In this step by step guide, we’ll be explaining how users can create and use eSign document templates to help maximise the features of our platform and save as much time as possible.
What are Document Templates?
A template can be defined as a document that has a pre-determined layout and style that can be edited to create the desired finished product for the user. It will include fields for where certain page elements should be added, for example standard text, a date stamp, or an eSignature. Templates allow for several new documents to be produced based on an existing style or design, which offers several benefits to businesses. We’ll be discussing the benefits of using templates later on in this guide.
What’s the Difference Between a Document and a Template?
On the surface it might seem like a document and a template are essentially the same, however there is a key difference that distinguishes them. Documents are typically sent only once and may contain specific information that is only relevant to that particular document.
Whereas a template allows users to create and save documents in the same or a similar format and can be sent multiple times to different people. There usually is the option to add a named person to a template, but you can also include placeholder roles. This means you can easily change the recipient and signer details when you need to send a new document.
How to Create a Template in eSign
eSign allows you to produce bespoke templates that include all the features required for your recipient to fill in. Follow our step-by-step guide below for how to create your own template.
Step 1 – Log in/Set up an account
If you already have an eSign account you can simply log in which will take you to the main dashboard. If you’re new to eSign you will need to set up an account. When doing so you will be able to sign up for a 14-day free trial*, or you can choose a paid plan that best suits your usage needs and requirements.
*It is important to note that on the eSign free trial, users only have the ability to access and edit 5 pre-built templates. To create your own templates and template library, you must sign up for a paid subscription.
Step 2 – Click templates
Once you’re logged in and can see your main dashboard, click the ‘Templates’ button to take you to the relevant page.
Step 3 – Create a template
Click ‘Create Template’ in the top left-hand corner to start building your template.
Step 4 – Add your document
At this stage you will need to add a name for your template and upload the relevant document from the dropdown options. You can upload a document from your library, device, templates, Google drive, Dropbox, or One Drive. Also, you can include the signer’s details or leave those fields blank.
Step 5 – Build your template and save
Customise your template using the eSign options, such as signature fields, text boxes and check boxes and then click ‘Save Template’ in the bottom right corner of the dashboard. This will save the template in your templates library for you to access at any time.
Once your template is saved, the envelope creation process becomes much quicker. Simply select ‘Template’ from the upload options when creating a new envelope and you will be shown your templates library to choose from.
How to Use Pre-Built Document Templates
As an eSign user, you will also have access to a number of pre-built templates. The steps below will show you how they can be used.
Step 1 – Click Templates
Once you have logged in or created an account, click the ‘Templates’ button in your dashboard.
Step 2 – Choose your preferred template
In the templates library, you’ll have a selection of pre-built documents you can access and use. Select the template you want to edit and click ‘Use’.
Step 3 – Add details
At this stage, you can personalise the template with a name, the details of the recipient, and the contents of the envelope including the title, subject, and description. You have the option to add up to 10 documents to be signed in the envelope by clicking ‘Add another document’. The recipient will receive an email with the envelope content and a link to the document ready for their electronic signature.
Step 4 – Edit the template
The document will be presented to you in a ready to edit format. It will already include built-in fields such as text boxes or signatures, but if you don’t require these you can replace them with new ones. Simply drag and drop your chosen labels into the document where the recipient will need to add information, tick a checkbox, sign, etc.
Step 5 – Delete/duplicate labels
To delete or duplicate a label, simply click on it and choose from the options displayed on the right-hand side of the dashboard.
Step 6 – Options for signatures
If you require multiple signers for a document, each signer will be assigned a different colour, so you can easily distinguish between them. Click and highlight to alternate between different signatures or to place them in a specific area on the document. Once a signer’s name has been highlighted, you can drag and drop the signature field into the correct place.
Step 7 – Confirm and send
When you are happy with the document, click ‘Continue’, here you can check that all the necessary recipients are added with correct email addresses and then click ‘Confirm and Send’.
What are the Benefits of Using Templates?
There are a number of benefits to using templates, whether you create your own or select a pre-built option.

1. Save Time and Money
Having a defined structure for sending important documents for your business is extremely cost effective. This is largely due to the significant amount of time that can be saved by using templates rather than creating new documents every time.
2. Offer Consistency and Uniformity
Using the same template style encourages uniformity in your documents, increasing the perceived professionalism of your business to your current and prospective customers. Additionally, a consistent structure makes it easier for your team to find key aspects of the document quickly.
3. Plenty of Flexibility
There are no limitations to how you can use a template. With the wide range of labels available, documents can be fully tailored to your business needs.
4. Reduce Errors
Templates minimise the risk of mistakes being made in your documents by establishing a clear structure. It’s more difficult to accidentally miss out information when it is specifically requested in mandatory fields, for example.
5. Easy to use
Our templates are designed to make it easier for users to send important documents on a regular basis. They are highly effective at saving time and making your processes more efficient.
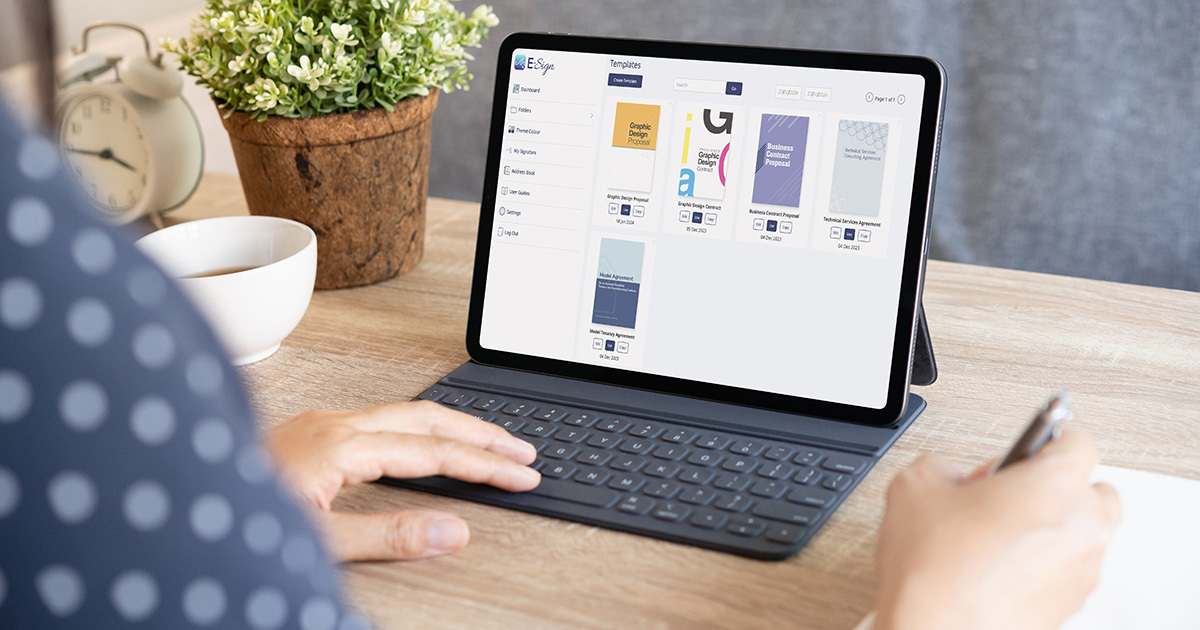
What Templates are Available Now on eSign?
- Technical Services Consultancy Agreement
- Business Contract Proposal
- Graphic Design Proposal
- Freelance Graphic Design Contract
- Model Tenancy Agreement
Template FAQs
Do I need an eSign account to use the free templates?
To access our free templates, you must sign up for a 14-day free trial (no card details required). During your free trial, you will have access to 5 free templates that you can customise, download and send. Once your free trial has ended, you can either sign up for a paid subscription if you choose to, or your E-Sign account will be closed.
Can I download the template to my device?
Yes. Once the template has been customised and sent for signing, you can download it to your device. You can also download a copy once the contract has been signed by the recipient. They will also have the option to download a copy.
Can I add an electronic signature with eSign?
Yes. Using our platform, you can attach e-signatures to all of your documents. This makes it easy for you and your customers to eSign documents online like contracts, tenancy agreements, and proposals.
See more of our template FAQs here.
Save time with eSign templates
With the help of this guide, you should now be able to create and customise eSign templates to align with your specific document requirements. If you haven’t already, sign up for our free trial and experience the benefits our templates can provide to your business today.
Still have questions? No problem, our friendly team is on hand to help answer any specific queries you may have about the templates, or the eSign system in general. Simply contact us to find out more.
Accreditations & Awards


Reviews & Security